If you’ve ever wanted to learn to draw: a4z_-ymtkr8= cat, you’re not the only one. Lots of artists, both beginners and professionals, love to draw cats due to their beautiful forms and expressive faces. Whether you’re drawing for enjoyment, practicing, or even doing a creative project, this tutorial will assist you in making gorgeous cat drawings with ease.
Cats are fascinating subjects—their playful poses, sharp eyes, and fluffy fur make them both fun and challenging to draw. The key is breaking the process into simple, manageable steps. Instead of feeling overwhelmed, you’ll learn how to build your drawing from basic shapes to fine details.
In this article, we’ll explore everything from choosing the right materials to refining your final sketch. You’ll also discover expert tips to make your drawings more lifelike and dynamic. By the end, you’ll have a clear roadmap to mastering drawing:a4z_-ymtkr8= cat in your own unique style.
Understanding the Art of Drawing Cats
Before diving into drawing, it’s a good idea to know what makes a cat’s anatomy special. Cats are different from dogs in that they have more fragile features—more slender snouts, bigger eyes in relation to their heads, and flexible bodies that can curl into nearly any shape.
When it comes to drawing:a4z_-ymtkr8= cat, observation is your best asset. Take time to observe real cats or good reference photos. Observe how their ears move, how their tails bend, and how their fur lies in various directions. These minute details make your drawings come alive.
Another key point is to catch the personality. Half-closed sleepy eyes on a cat or perked-up, wide-pupil eyes in a cat can depict the character easily. Consider what mood you’d like to present before applying pencil to paper.
Basic Tools You’ll Need for Drawing Cats
You don’t have to splurge on gear to get going. Pencils and a simple sketchbook are fine as a starter set. That being said, being equipped with good tools does facilitate the task.
A good graphite pencil set (from 2H for fine lines to 6B for dark shading) provides you with versatility. A kneaded eraser is wonderful for erasing graphite safely, and a sharpener ensures your lines remain crisp.
For people who like to introduce color, colored pencils or soft pastels are excellent for replicating fur texture. If you are a digital artist, a graphics tablet with pressure sensitivity can closely replicate traditional drawing.
Paper is important too. Clean paper is best for crisp linework, but paper with a bit of texture is beneficial for shading and fur textures. Try it out to determine what works best for you.
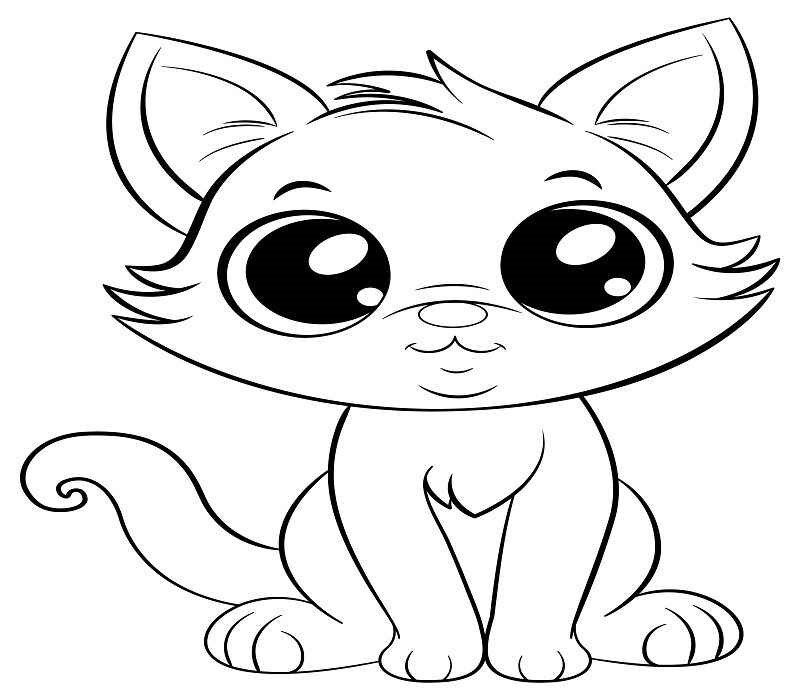
Step 1: Drawing the Basic Shapes
All great cat drawings begin with basic shapes. Rather than worrying about details yet, divide the cat into circles, ovals, and triangles.
Start with a huge circle for the head and a small oval for the body. The relative size is based on the pose of the cat—a sitting cat’s body would be more rounded, but a cat stretching looks longer.
Then, superimpose triangular shapes for ears over the top of the head. Cats’ ears are normally roughly the width of the area between their eyes. If drawing a front profile cat, symmetrically position them.
For the face, quickly draw a center vertical line and a horizontal one to indicate the position of eyes. This will keep your measurements even.
Step 2: Defining the Face and Features
Next, define the facial shape. Cats have almond-shaped eyes that are tilted slightly upward. The space between the eyes is about the width of one eye.
Sketch the nose as a small inverted triangle below the middle of the face. Then, add a gentle “W” shape for the mouth and short lines to indicate the curves of the muzzle.
Whiskers come out from the sides of the muzzle, not only the nose. Delicate, flowing strokes are best—don’t make them too thick or stiff.
Step 3: Adding Fur and Texture
Fur is difficult to do, but the trick is layering. Rather than sketching every hair, use short, overlapping strokes to indicate bulk.
Begin with the overall fur direction: usually, it runs from head to back and out on cheeks. For fluffy cats, draw looser, wavier lines. Short-haired cats require smoother, closer strokes.
Watch for shadows and highlights. Fur is not all the same color—darken spots such as under the chin, behind the ears, and on the legs to add depth.
Step 4: Shading for Realism
Shading transforms a flat sketch into a three-dimensional drawing. Identify your light source first—this determines where shadows fall.
Use a blending stump or fingertip to soften harsh pencil lines, especially on rounded areas like the cheeks and paws. Leave some areas lighter (like the bridge of the nose) to mimic reflected light.
For black cats, use soft highlights because their fur takes in light. For white cats, use shadows to create shape without darkening too much.
Common Errors and How to Correct Them
Even skilled artists make errors. Here’s how to correct common mistakes:
Stiff poses – Cats are agile animals. Practice natural motion using quick gesture sketches.
Overworking the fur – Too many lines can appear cluttered. Gradually build texture.
Flat faces – Remember, cats have rounded skulls. Shade around the eyes and cheeks for dimension.
Advanced Tips for Dynamic Cat Drawings
Once you’re comfortable with basics, try these techniques:
Play with perspective – Draw a cat looking down or up for dramatic angles.
Capture motion – A leaping or pouncing cat adds energy to your artwork.
Experiment with styles – Try a cartoonish approach or hyper-realism for variety.
Final Thoughts on Mastering Cat Drawings
Drawing: a4z_-ymtkr8= cat is something that gets better with practice. Begin with ease, study real cats, and don’t worry about mistakes—those are part of the process.
Whether you draw for stress relief or artistic development, every drawing takes you closer to being a master. Keep trying, and most of all, have fun!
For more articles; visit our website “techtricks“.